Spotweb on Centos 6.5

Disclaimer: This is not my product, nor do I maintain it. I merely had some struggles getting this to work for testing purposes and setup a simple guide for future reference.

Spotweb is a web utility which indexes various posts on usenet.

Prerequisites:
– Make sure your /var (or wheve-ever your www folder is located has at least 15GB)
– Have apache2, php5 and mysql 5 installed (standard repo is good): This guide will not handle the installation of a webserver with php and mysql.
– Your server / vm should have 2 cores and at least 1GB of RAM

Step 1: Installing software + deploying spotweb

yum install git
cd /var/www/html/ -your own folder-
git clone https://github.com/spotweb/spotweb.git
cd spotweb/
mkdir cache
chmod 777 cache/

Step 2: Installing spotweb
Navigate in your browser to either localhost or . For example: http://10.0.0.143/install.php
Check if everything is OK.
The following two items may be NOT OK:
– PostgresqlDB
– Own settings file

If everything is oke, click next.

Step 3: Setting the db settings
In this screen leave everything as is, except for the password. Change it to something you seem fit.
Click next

Step 4: Configuring usenet provider & admin user
In this screen fill in your own usenet provider
Hint: I prefer to use custom (at the bottom) and port 119. SSL seems to have troubles with retrieving from time to time.

In the next screen you can create your own admin user.
Admin /admin/ administrator etc are forbidden.
Just choose your own nickname and strong password!
Fill in the rest of the details (I wouldnt recommend using your real name and email).

Press next for the last step in the web install phase.

Step 5: Creating db file
Go back to the command line

vim dbsettings.inc.php
copy / paste the settings as shown into this file and save it.

Don’t forget to check if the url works! 🙂

Step 6: Install.php
To make sure nobody can ruin your installation or hijack it we’re going to move the install.php
Either remove it, or move it to your home directory

mv install.php /home/<username>spotweb
OR
rm -f install.php

Step 7: Backing up the folder in tar.gz for future use

cd .. (make sure u are one level above the spotweb folder)
tar -cvf spotweb.tar.gz spotweb/
mv spotweb.tar.gz /home/<user>/spotweb/

Step 8: Creating a database for spotweb

mysql -u root -p
CREATE DATABASE spotweb;
CREATE USER 'spotweb'@'localhost' IDENTIFIED BY '<your own password>';
GRANT ALL PRIVILEGES ON spotweb.* TO spotweb @'localhost' IDENTIFIED BY '<your own password>';
quit;

Step 9: Making a cronjob for retrieving the spots

crontab -e */30 * * * * cd /path/to/spotweb && /usr/bin/php retrieve.php > /dev/null
service crond restart
crontab -l Now this rule should be shown:
crontab -e */30 * * * * cd /path/to/spotweb && /usr/bin/php retrieve.php > /dev/null

Step 10: Login to spotweb
Use the credentials u choose during installation.
In the top right corner press config > settings > retrieve
Check with your usenet provider how much retention you have and fill in the correct number.

I am still toying around with the other settings. Check back later to see what I used.

Tips and tricks:
– Git pull can be used inside the spotweb directory to update to a newer version (backup before you do!)
– php upgrade-db.php can be used to check the database when applying a newer version of spotweb.

Compile Zabbix 2.2.6 LTS on Centos 6.4 x64

Complete step by step guide on how to compile zabbix.

!!! Please be aware this is still heavily under construction! I decided to use the appliance instead!!!

Prequisites:
– Centos 6.5 X64 minimal or net-install with basic server (installed)
– root access
– Mysql installed
– Apache installed
– ssh access
– static ip

Step 1: Download & extract package and make directory

cd /home/&lt;user&gt;
mkdir zabbix
cd zabbix
wget http://sourceforge.net/projects/zabbix/files/ZABBIX%20Latest%20Stable/2.2.6/zabbix-2.2.6.tar.gz
tar -xzvf zabbix-2.2.6.tar.gz
cd zabbix-2.2.6

Step 2: Make group and user
! change to root !

sudo su
groupadd zabbix
useradd -g zabbix zabbix

Step 2: Install dependencies etc

yum -y install gcc libxml2-devel net-snmp-devel libcurl curl curl-devel rpmdevtools kernel-devel 
yum -y install mysql-devel
cd 

Step 3: Configure zabbix & make install

cd /home/&lt;user&gt;/zabbix-2.2.6/ (if you were not already).
./configure --enable-server --enable-agent --with-mysql --enable-ipv6 --with-net-snmp --with-libcurl --with-libxml2
make install

You know have compiled your own zabbix

Step 4: Create an RPM package:

mkdir /home/&lt;user&gt;/zabbix
cd /home/&lt;user&gt;/zabbix
wget http://dag.wieers.com/rpm/packages/checkinstall/checkinstall-1.6.0-3.el5.rf.i386.rpm
rpm -ivh checkinstall-1.6.0-3.el5.rf.i386.rpm 
cd zabbix-2.2.6
checkinstall --nodoc --install=yes -y

Step 5: Install RPM package: WORK IN PROGRESS!

rpm -ivh &lt;zabbix&gt;.rpm

Step 6: Configure config files
Sources:
1. https://www.zabbix.com/wiki/howto/install/centos/centosinstall
2. https://www.zabbix.com/documentation/2.2/manual/installation/install

DNS over VPN

Recently i got my hands on an M350G5 HP server. Which is completly whitelisted for Esxi 5.*
So now i have two ESXI machines. One at my home and one at my dad’s house.

I planned out some VM’s like ubuntu desktop, vcenter etc etc.
On both addresses i have Fritz!box 7390 routers. Which are capable of setting up a LAN to LAN vpn tunnel quite easily. (No hassle ;))

So far so good, but i have a DNS at my home with ip 192.168.0.122 and i wanted to use that DNS in my dad’s network aswell.

My DNS server is a Centos 6.5 (Chroot) bind server. Which has records for all VM’s and machines with a static ip like routers etc.

But then the trouble began. I wasnt able to resolve from my dad’s house to mine.. But to make a long story short, there is an easy trick to get the DNS server working on both networks.

In the /etc/named.conf file, there is this bit:

options {
        listen-on port 53 { 127.0.0.1; 192.168.0.122;};
        listen-on-v6 port 53 { ::1; };
        directory       /var/named
        dump-file       /var/named/data/cache_dump.db
        statistics-file /var/named/data/named_stats.txt
        memstatistics-file /var/named/data/named_mem_stats.txt
        allow-query     { localhost; 192.168.0.0/24;};

We want to focus on the allow-query part.
As you can see now there is only one network allowed besides the localhost. At my home i have the ip range of 192.168.0.0/24, but at my dad’s house it is 192.168.1.0.
After an entire day of trial and error i stumbled upon a forum post which pointed me in this direction.
Simply change to:

allow-query     { localhost; 192.168.0.0/24; 192.168.1.0/24;};

All your dig / nslookup / ping tests will work.

To be sure this works, please perform a service named restart as root.
Important note: Please be aware that the network settings can be different for you. Change them to the range your network is using.

Networking on CentOS (6.*)

Static ip:

Configure eth0

nano /etc/sysconfig/network-scripts/ifcfg-eth0
DEVICE="eth0"
NM_CONTROLLED="yes"
ONBOOT=yes
HWADDR=A4:BA:DB:37:F1:04
TYPE=Ethernet
BOOTPROTO=static
NAME="System eth0"
UUID=5fb06bd0-0bb0-7ffb-45f1-d6edd65f3e03
IPADDR=192.168.1.44
NETMASK=255.255.255.0

Configure Default Gateway

 nano /etc/sysconfig/network
NETWORKING=yes
HOSTNAME=centos6
GATEWAY=192.168.1.1

Restart Network Interface

/etc/init.d/network restart

OR:

service network restart

Configure DNS Server

nano /etc/resolv.conf
nameserver 8.8.8.8 # Replace with your nameserver ip
nameserver 192.168.1.1 # Replace with your nameserver ip

Set up ssh:

nano /etc/ssh/sshd_config

Config file

Coming soon!

Restart the sshd service:

# /etc/init.d/sshd restart

OR

# service sshd restart

Install the open vm tools:

Installing from the OSP repository

RHEL / CentOS / Scientific Linux

1. Obtain and import the VMware Packaging Public GPG key:

wget http://packages.vmware.com/tools/keys/VMWARE-PACKAGING-GPG-RSA-KEY.pub

2. Import the key:

rpm --import VMWARE-PACKAGING-GPG-RSA-KEY.pub

3. Add the repository by creating the file /etc/yum.repos.d/vmware-tools.repo and adding the following:

[vmware-tools]
name=VMware Tools for CentOS (or OEL) $releasever - $basearch
baseurl=http://packages.vmware.com/tools/esx/5.0u2/rhel6/x86_64
enabled=1
gpgcheck=1
gpgkey=file:///srv/crypto/VMWARE-PACKAGING-GPG-RSA-KEY.pub

Edit the gpgkey line for wherever you stored the public key. Edit the baseurl line for appropriate version of ESXi, distribution and architecture.

4. Install the VMware Tools

apt-get install vmware-tools-esx

or, for no graphical support:

apt-get install vmware-tools-esx-nox

Disk error Centos 6.* install

Hello all,

Recently i tried to install CentOS 6.4 net install x64 on my Vmware ESXI 5.1 server.

During this i encountered a problem that my disk was ejected and no disk could be founnd. Luckily there is a simple solution for this.

When installing skip the media test.

Image

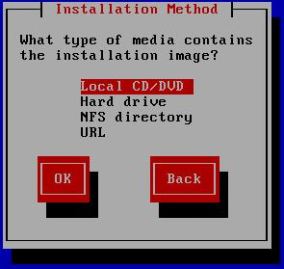
Continue through the menu’s until you get the screen where you can choose the installation method:

Image

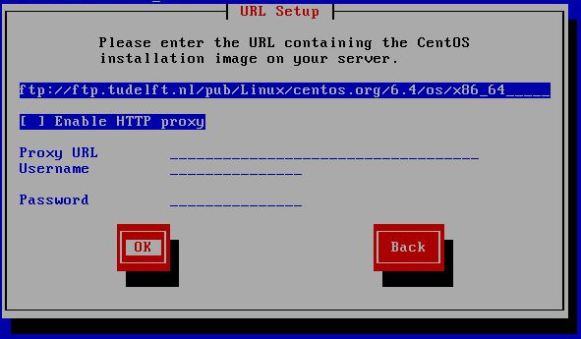
Choose for url and enter the following URL:

ftp://ftp.tudelft.nl/pub/Linux/centos.org/6.4/os/x86_64/
* or a mirror of your personal choosing

Image


After this installation continues as normal! 

Good luck!